![]() Last week I wrote about experiments that I have been doing with the Tulip API, and showed how you can use Xojo, a low-code cross-platform application development tool, to develop a native desktop app that integrates with Tulip.
Last week I wrote about experiments that I have been doing with the Tulip API, and showed how you can use Xojo, a low-code cross-platform application development tool, to develop a native desktop app that integrates with Tulip.
In that post, I mentioned that there was code in the Xojo project that could be used to build other types of apps that integrate with Tulip. In this post, I'm going to share a Xojo Web application that integrates with Tulip.
The Web Application
To get started, here's a short animation that shows the Web application.

Click the image to view a larger version.
The application gives users an easy way to lookup the status of a manufacturing job that is being processed and tracked in Tulip. The user enters the Customer Number and Reference Number of a job that they want to lookup. When the form is submitted, the app calls the Tulip API to query a table of Jobs. If the job is found, the API returns it to the Web app, which in turn displays information about the job, including its status, the product being manufactured, the quantity, and the date and time that the job was last updated in Tulip.
The animation shows a user looking up two jobs. The second job, which has been completed and shipped, has a photo stored on its record in the Tulip table. After the job itself has been loaded from the Tulip API, a second API call is made to get a "signed URL" for the file attachment. It's the signed URL that is actually used to display the image.
The Tulip Table
In Tulip, the Jobs table that this Web app is integrated with looks like this.
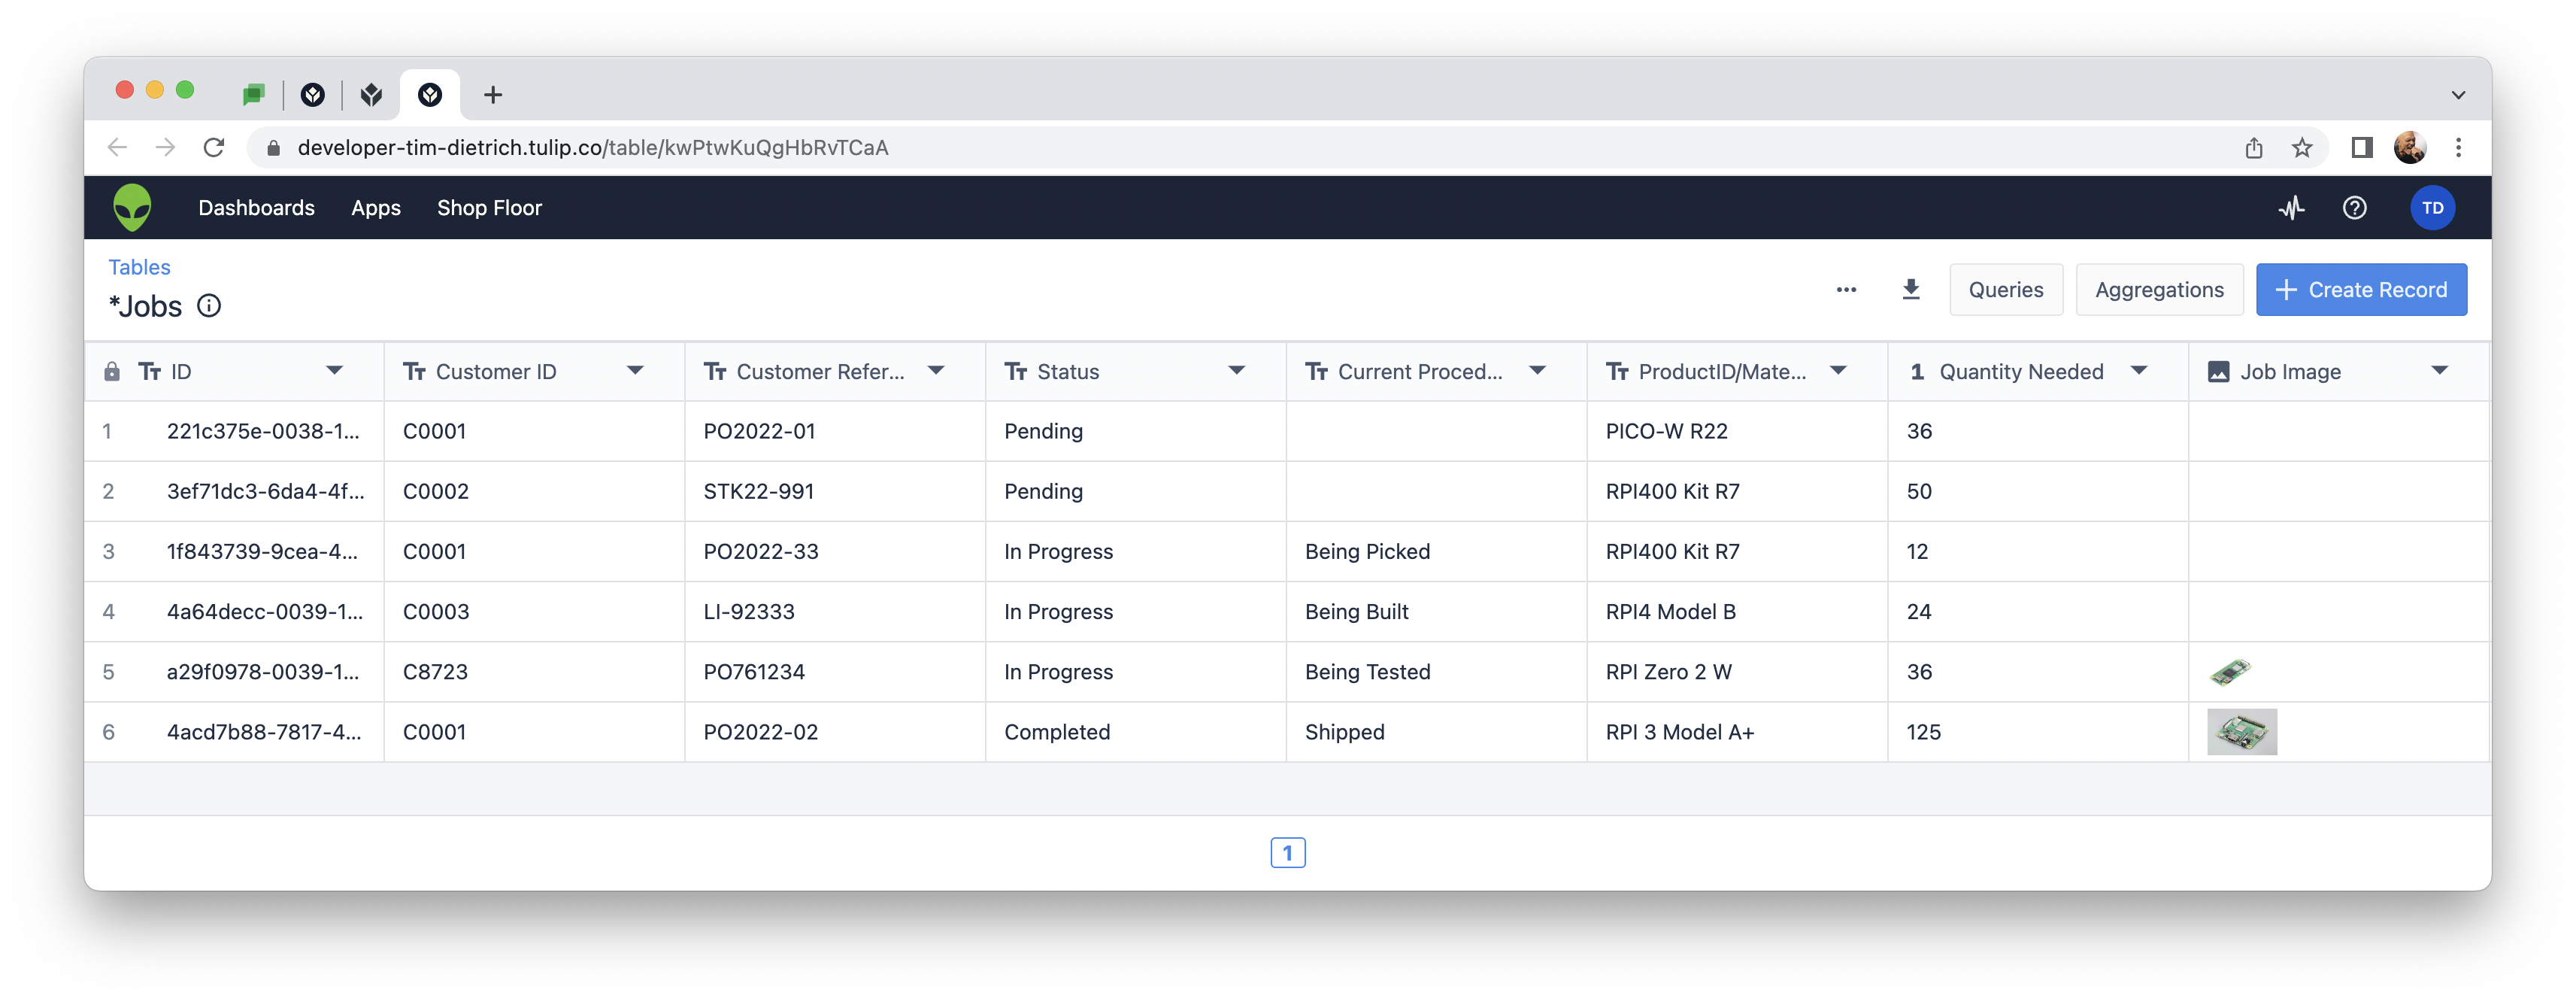
Click the image to view a larger version.
The table is a modified version of a table that is created when the Job Module is installed in a Tulip account. I've simply added a few columns to track the customer number and the customer's reference number.
The Xojo Project
I'm not going to review the Xojo project in great detail, but I do want to point out a few things.
The App object contains three constants that are used to make calls to the Tulip API:
• TulipAccountSubdomain is the subdomain of your Tulip account. For example, if the URL to your account is https://my-account.tulip.co/, then the subdomain is: my-account
• TulipAPIAuthHeader is the "Auth Header" value that is assigned to your Tulip bot. For information on how to create a Tulip Bot, please refer to this Tulip Knowledge Base article.
• TulipTableID is the internal ID assigned by Tulip to your Jobs table.
The tulipAPIConnection class is the same class that I used in the Tulip API Explorer - the Xojo-based desktop app that I discussed and shared in my previous post. The tulipAPIConnection class is a subclass of Xojo's URLConnection class, and I designed it to make calling the Tulip API as easy as possible. In this Web app, two instances of the tulipAPIConnection class are used. One instance (tulipAPIConnection1) is used to get the job, and the other (tulipAPIConnection2) is used to get the signed image URLs.
The app's only real complexity is in the ContentReceived event handler of tulipAPIConnection1. That's where the data received from the Tulip API is parsed and used to display information to the user. The image below shows the ContentReceived event handler as it appears in the Xojo IDE.

Click the image to view a larger version.
One more thing: WebPage1 includes a method named JobImageGet. It's called from tulipAPIConnection1's ContentReceived event handler, but only in cases where the job has a file attachment.
Downloading Xojo and the Project File
![]() If you haven't already done so, you should first download Xojo. With Xojo, you can build apps and run them in debug mode for as long as you'd like, and do so free of charge. If you reach a point where you'd like to build (compile) an app and run it as an executable, then you'll need to purchase a license. As of this post, Xojo Web licenses are available for $399 USD. But if you think you're going to want to build other types of apps as well, then my recommendation is to purchase Xojo's "Pro" license, which supports compiling Web, desktop, mobile, and console apps.
If you haven't already done so, you should first download Xojo. With Xojo, you can build apps and run them in debug mode for as long as you'd like, and do so free of charge. If you reach a point where you'd like to build (compile) an app and run it as an executable, then you'll need to purchase a license. As of this post, Xojo Web licenses are available for $399 USD. But if you think you're going to want to build other types of apps as well, then my recommendation is to purchase Xojo's "Pro" license, which supports compiling Web, desktop, mobile, and console apps.
If you'd like to download the Xojo project file, it's available here:
https://tdietrich-opensource.s3.amazonaws.com/tulip/tulip-job-lookup.xojo_binary_project.zip
You'll need to make a few changes to the app, including setting the constants that I mentioned above (TulipAccountSubdomain, TulipAPIAuthHeader, and TulipTableID), and updating the logic in tulipAPIConnection1's ContentReceived event handler.
Hosting The Web App
You can test a Xojo Web app by running it in debug mode, in much the same way that I showed in the previous blog post.
In the animation above, the Web app was running on a Raspberry Pi 400. With Xojo's cross-platform capabilities, I could just as easily have compiled the app for and hosted it on a Mac, a Windows-based PC, or a Linux-based server.
When it comes to Xojo Web apps, another hosting option is Xojo Cloud, a highly secure, zero configuration hosting service that requires no maintenance. Deploying Web apps to Xojo Cloud is fast and seamless.
Wrapping Up
As I mentioned in my previous post, Tulip is a "no-code" application development platform, and Xojo is a "low-code" application development platform. Whether you're a Tulip developer that has no programming experience and wants to take the first step to learning how to write code, or an experienced developer that's looking for a new development platform to work with, I think you'll find Xojo to be interesting.
When combined with Tulip's API, Xojo gives us the ability to rapidly build native desktop, mobile, Web, and console apps, that run on everything from Macs, Windows PCs, mobile devices, and more.
To learn more about Xojo, visit xojo.com.