![]() Handlebars is a popular templating language that can be used to dynamically generate HTML content by merging an input object with an HTML template. It's available as a Javascript library, and while it is very easy to use, the language is also quite flexible and powerful.
Handlebars is a popular templating language that can be used to dynamically generate HTML content by merging an input object with an HTML template. It's available as a Javascript library, and while it is very easy to use, the language is also quite flexible and powerful.
I've used Handlebars in several Web projects in the past, and really enjoyed working with it. So I was curious to use if I could use Handlebars in some of the Tulip projects that I'm working on. To do so, I developed another Tulip custom widget, which I'm calling the "Handlebars Custom Widget." In this post, I'll share a link to the custom widget and explain how to use it.
Before diving into the details of the Handlebars widget, here's a short animation showing an instance of it running in an app within the Tulip Player.

Supported Properties
To use the Handlebars custom widget, you simply drag an instance of the widget onto a step and then configure a few properties: a Handlebars-based template, a Javascript snippet, and optional CSS to customize the style of the rendered content.
The Template Property
The template can be as basic or as complex as you need it to be, and it consists of both HTML and embedded Handlebars expressions. For example, here's a basic template.
<template id="template">
<h1>Tulip Developers</h1>
{{#each developers}}
<p>
<a href="#" onclick="fireEvent( 'Link Clicked', '{{name}}' ); return false;">{{name}}</a><br>
• {{email}}
</p>
{{/each}}
</template>
If you're familiar with HTML, then you probably already have a good idea of what that template does. It takes an array of developers, iterates over them, and for each developer it adds a paragraph containing their name and email address. In addition, the the developer's name will be treated as a link. (More on that in a moment.)
Again, this is a very simple template. If you'd like to learn more about the Handlebars templating language and what it is capable of doing, check out the Handlebars Language Guide.
The Javascript Property
The Javascript property can be a little tricky, because it serves a few purposes.
First, it defines the input object that you want to merge with the template. It also contains a few Javascript commands that the Handlebars library uses to compile the template, perform the merge, and then display the generated content. That probably sounds more complicated then it really is, so let's look at an example of a Javascript property.
var developers = [
	{ "name": "Pete Hartnett", "email": "pete.hartnett@tulip.co" },
	{ "name": "Rus Waddell", "email": "russ.waddell@tulip.co" },
	{ "name": "Tim Dietrich", "email": "timdietrich@me.com" }
];

var template = document.getElementById( "template" ).innerHTML;

var compiledTemplate = Handlebars.compile( template );

document.getElementById( "contentBlock" ).innerHTML = compiledTemplate( { developers: developers } );
As you can see, in the Javascript block, I'm first setting up an object that is an array of other objects. In this case, it's an array of 3 developers.
Next, I'm defining the template, and setting it to a variable named "template." This might seem redundant, but the reason that I'm doing this is that it is entirely possible to use a single instance of a Handlebars widget to generate content consisting of multiple input objects and/or multiple templates.
I'm then setting a variable named "compiledTemplate" to a compiled version of the template, which I'm then using to execute the compiled template and merge it with the developers object. The dynamically generated content is then injected into a DIV tag with an ID of "contentBlock." (The contentBlock DIV is included as part of the Handlebars widget.)
The Style Property
The Style property is optional, and can be used to customize the display of the DIV that holds the rendered content. Here's an example.
margin: 0px;
border: 1px solid #ccc;
padding: 12px;
font-family: sans-serif;
font-size: 18pt;
Those styles will be applied to the "contentBlock" div that the widget generates. So by using the Style property, you can control the outer DIV. Of course, you can also control the rendered content by using inline styles, or by including a stylesheet in the template itself. For example:
<style>
h1 { color: green; font-size: 36pt; }
a {color: red; }
</style>
<template id="template">
<h1>Tulip Developers</h1>
{{#each developers}}
<p>
<a href="#" onclick="fireEvent( 'Link Clicked', '{{name}}' ); return false;">{{name}}</a><br>
• {{email}}
</p>
{{/each}}
</template>
By combining the widget's Style property and using a stylesheet in the template, you have total control over how the rendered content will appear.
The "Link Clicked" Event
In the template example that I used above, I had wrapped the developer name in a link. For example:
<a href="#" onclick="fireEvent( 'Link Clicked', '{{name}}' ); return false;">{{name}}</a>
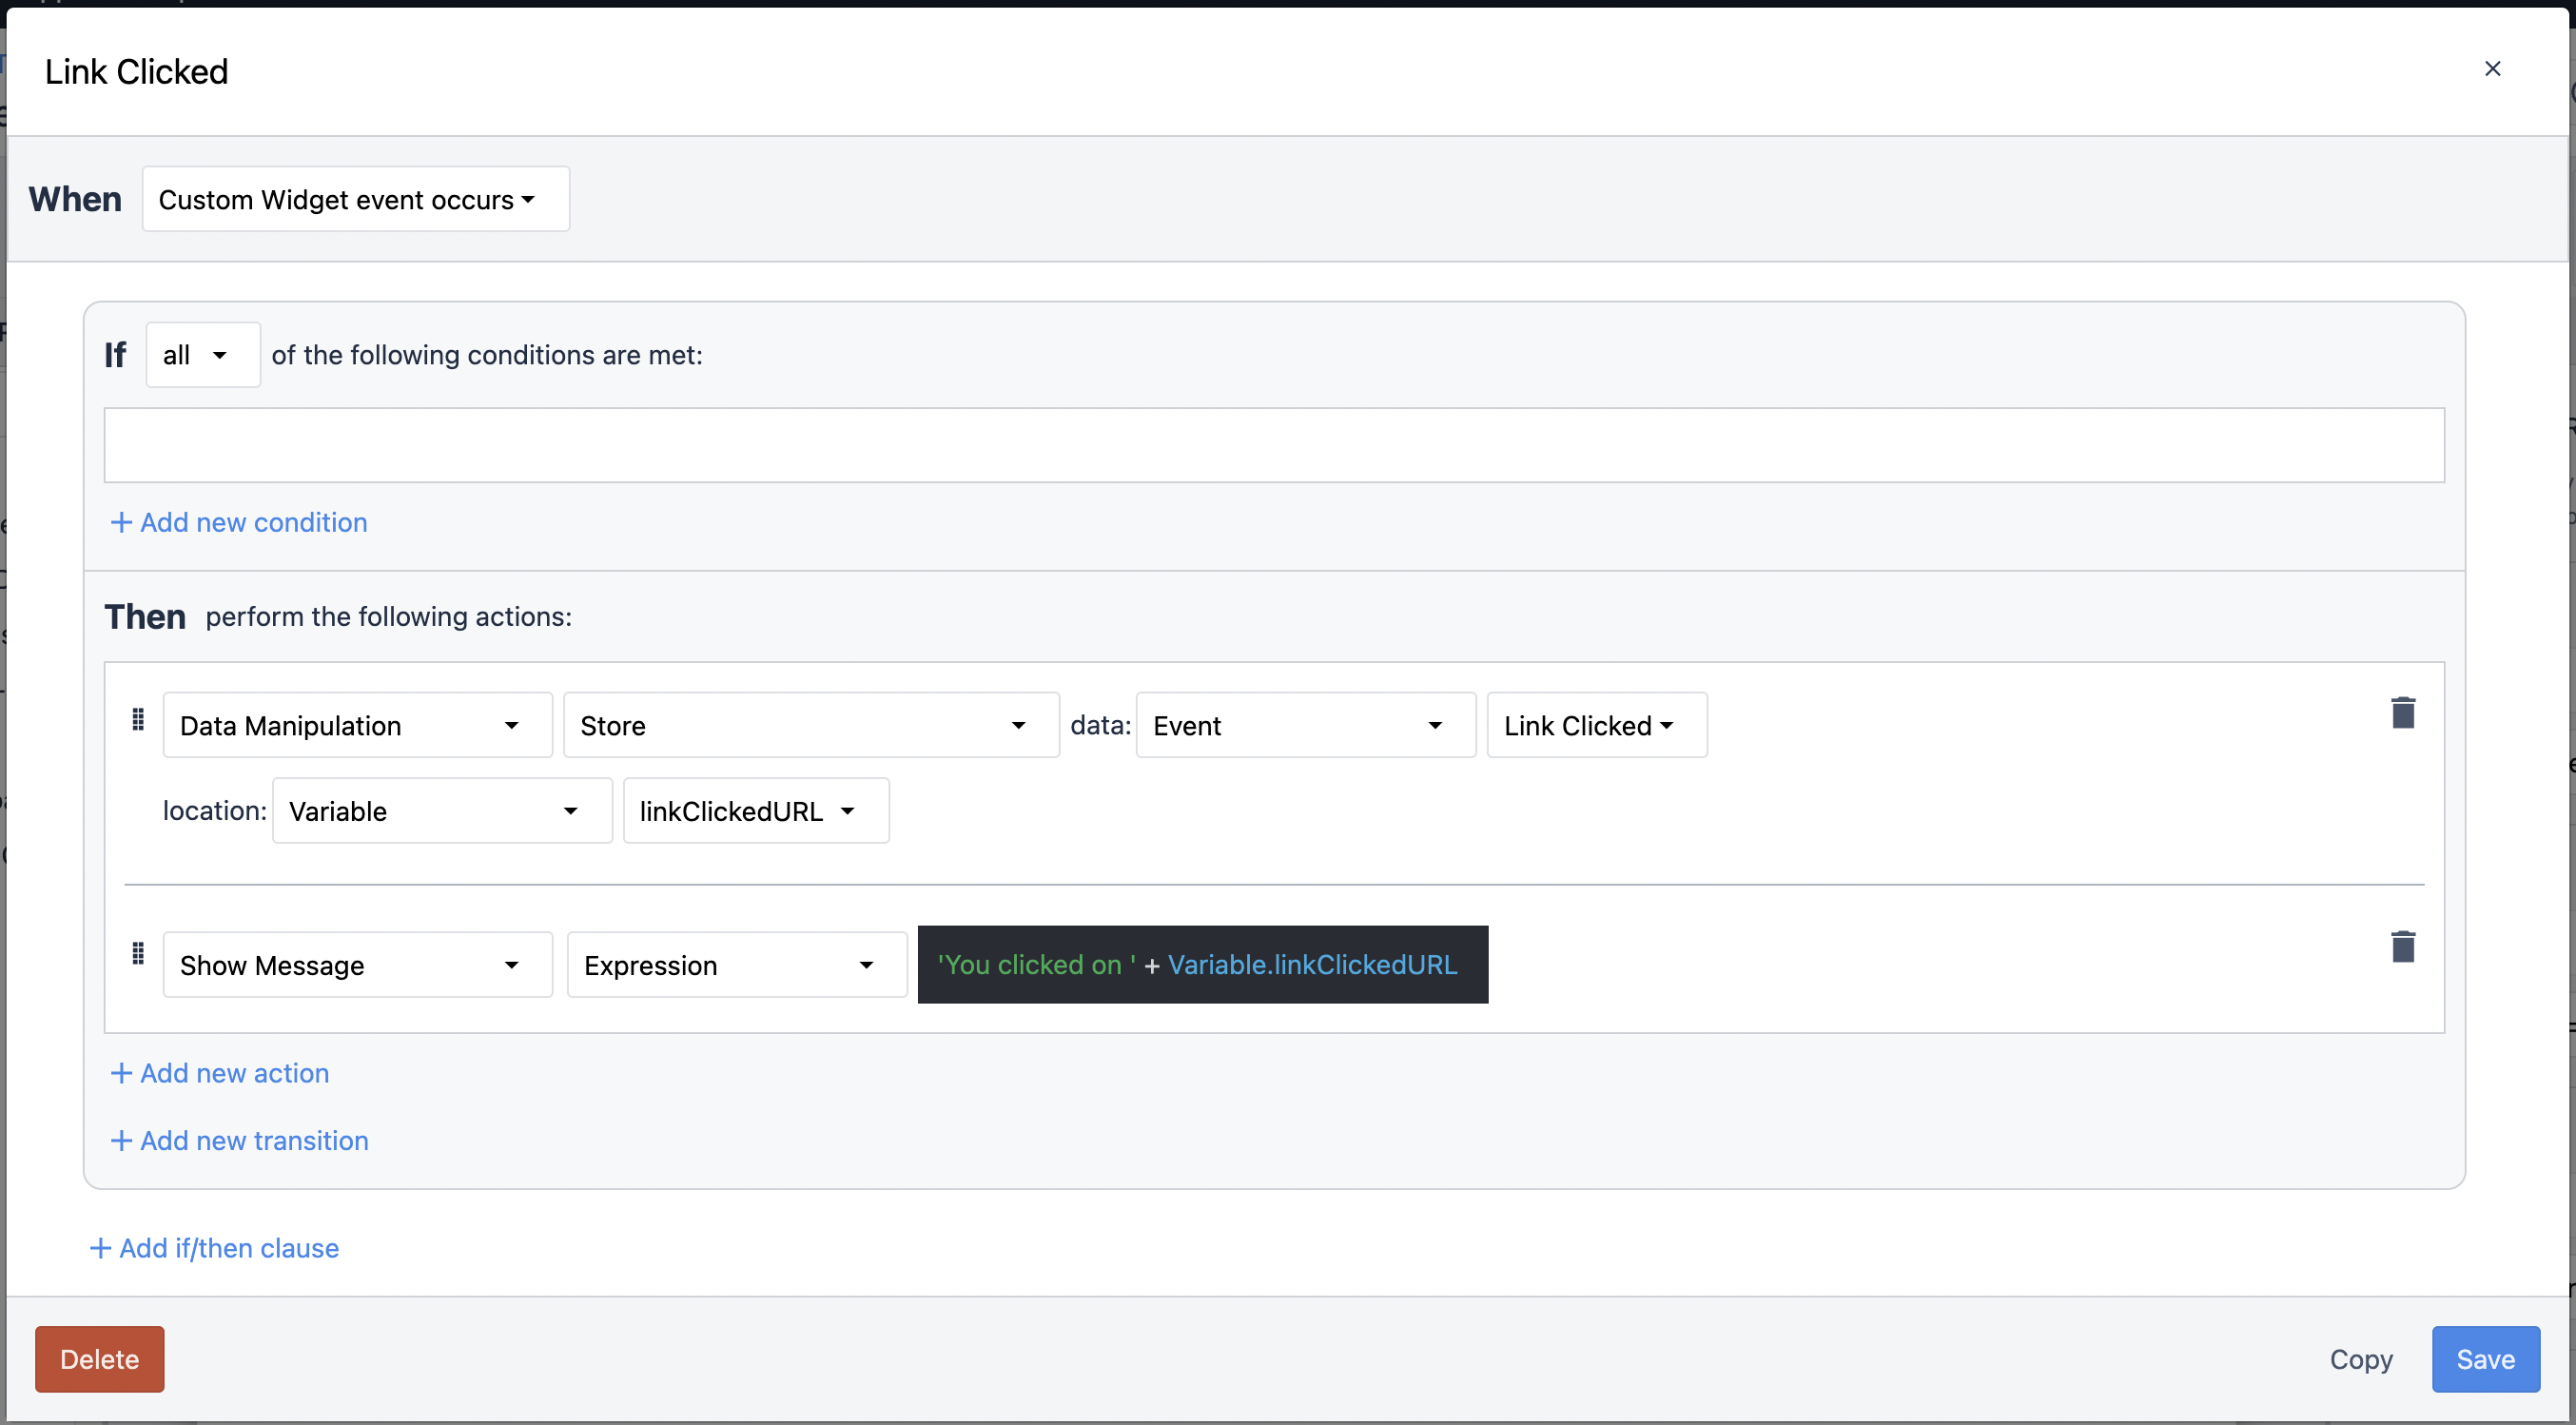
The link is used to fire the widget's "Link Clicked" event. And in this example, when that event fires, the developer's name is passed to the event handler. As a result, you can act on the click - maybe set a Tulip variable, navigate to another step, and so on. Here's a screenshot of a Link Clicked trigger added to Handlebars widget.
Downloading the Widget
To download the Handlebars custom widget, click here:
customWidget-Handlebars-v1.0.json
To install the widget, log into your Tulip account, navigate to Settings, select Custom Widgets, click the "..." button (located in the top right corner of the window), and select Import.
Wrapping Up
This is the third Tulip custom widget that I've shared, and if you've been following my blog, you might see a theme running through the widgets. I'm primarily developing and using them to help with the display of content in Tulip apps.
The DataTable Custom Widget is designed to generate HTML tables with advanced interaction controls, including pagination, keyword searching, sorting, and more.
The jsExecute Custom Widget can be used for a number of purposes, but I'm primarily using it to get remote content via Web APIs without the need for connector functions. I often use the result of those API calls as inputs to the DataTable widget or to the Handlebars widget.
And with the new Handlebars widget, my goal is to make it easy to use templating to dynamically generate content.
I have another Tulip custom widget that follows this "content display" theme, and I hope to share it here very soon.