I started using SuiteQL in my NetSuite integrations back in May of 2020. At the time, I was primarily issuing queries from remote apps and systems using SuiteTalk REST. However, it wasn't long before I realized that I wanted, and in some cases needed, more control and better performance than what SuiteTalk provides.
So I started experimenting with running SuiteQL queries via RESTlets. With RESTlets, I was able to overcome some of the limitations of SuiteTalk. For example, I was able to retrieve up to 5,000 rows in a single request - where SuiteTalk REST only returns a maximum of 3,000 rows. And in terms of performance, again, I generally saw better performance than what I had been getting from SuiteTalk. Since then, for nearly all of my NetSuite integrations, I've used RESTlets.
The SuiteQL Query API
Included at the end of this post is a simple RESTlet - which I've been referring to as the "SuiteQL Query API." I developed it to make it easier for developers to leverage SuiteQL in their NetSuite integrations.
And when I say that the RESTlet is simple, I mean very simple. To make a call, you send an HTTP POST request to the RESTlet's deployment URL, and the request body is a JSON-encoded payload that includes the query and optional query parameters.
For example, here's a sample cURL request with a query against the Employee table.
curl -X "POST" "https://tstdrv2593109.restlets.api.netsuite.com/app/site/hosting/restlet.nl?script=127&deploy=2" \
     -H 'Content-Type: application/json' \
     -H 'Authorization: OAuth oauth_consumer_key="cad7ba913849a6623318aaedc4a9837b18cfbd234c907056dae4f2357c4b6bb6", oauth_nonce="ODp1rCjhD0kpOfwKVGvahaRClOSdsKc1", oauth_signature="FVSXl6eiq%2FeX3UVh6aE0Jnx4IlRN9KDNnaZbAZAWGNI%3D", oauth_signature_method="HMAC-SHA256", oauth_timestamp="1638384134", oauth_token="0421ceb949c7ea37531a272a630d23ba02c5f47afd3dfa45c8b4f9b67ea6f2a0", oauth_version="1.0", realm=TSTDRV2593109' \
     -d $'{
  "query": "SELECT ID, FirstName, LastName, Title FROM Employee WHERE Title LIKE ? ORDER BY LastName, FirstName",
  "params": [ "Sales%" ]
}'
To use the RESTlet, you can authenticate using Token-Based Authentication - thus the need for the "Authorization" request header in the example above. How you generate the value for the Authorization will depend on the system that you are making the HTTP calls from.
Here's a short animation that shows the RESTlet being called from Postman.

Click the image to view a larger version.
Installation and Setup
I often get questions about how to install the SuiteScripts that I share. So in this post, I'll show how to install the SuiteQL Query API RESTlet, and how to setup a role, an integration record, and an access token so that you can make calls to it.
Step 1: Install the Script
Before we get started, download the script, and unzip it.
To install the script, navigate to Customization > Scripting > Scripts > New. You'll see the Upload Script File form, like this.
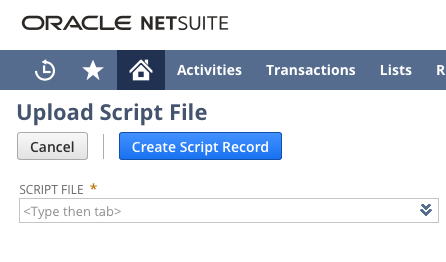
Hover over the Script File field, and you'll see a "+" button appear to the right of the field. Click the button and the File upload form will appear.

By default, the script will be uploaded to SuiteScripts folder in your File Cabinet (or to the last folder that you uploaded a script to). If you'd like to install the script in an alternative folder, select it from the Folder field.
Next, click the "Choose File" button in the Select File field. Then navigate to the folder that you unzipped the file to, and select the file.
Then click the Save button. The file will be uploaded, and then the Upload Script File form will reappear, with the Script File field loaded.
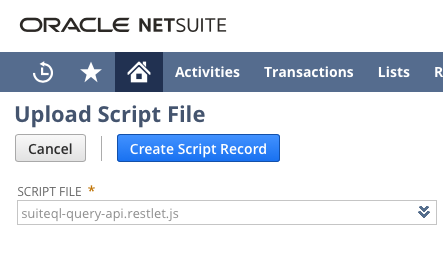
Click the Create Script Record button to continue. The Script form will appear.
In the Name field enter: SuiteQL Query API
In the ID field enter: _suiteql_query_api
Click on the Deployments tab, and enter the following values:
Title: SuiteQL Query API
ID: _suiteql_query_api
You might want to set the Status to Released.
The completed form should look like this.

Click the Save button to finish the installation process.
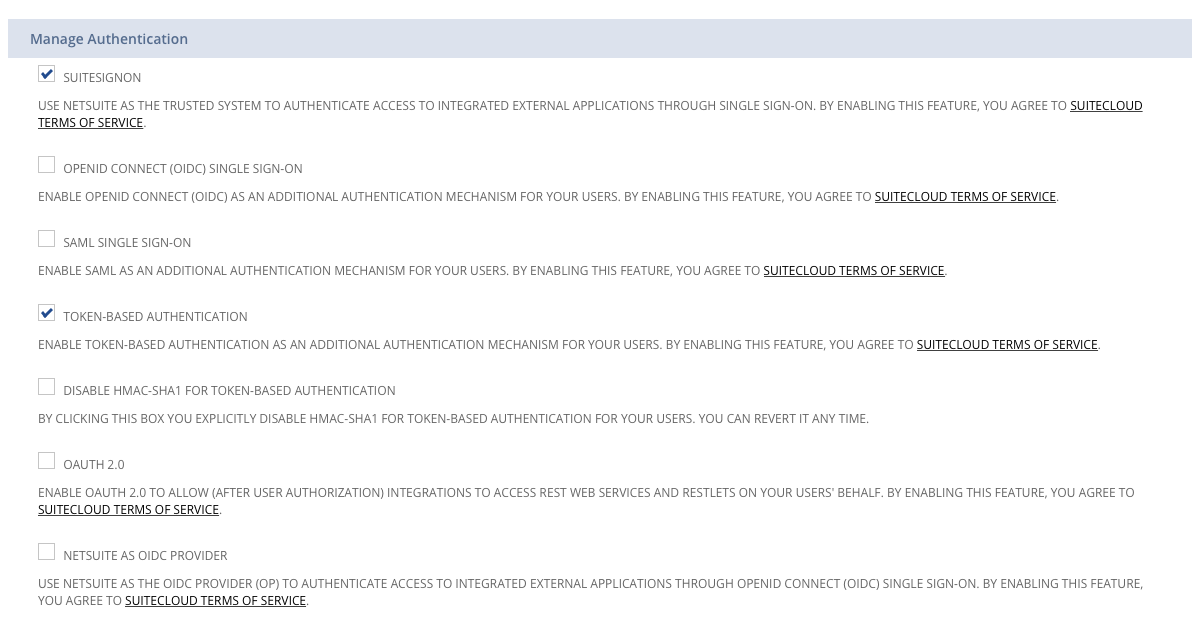
Step 2: Enable Token-Based Authentication
Before we continue, take a moment to confirm that your account has Token-Based Authentication enabled. To do so, navigate to: Setup > Company > Enable Features > SuiteCloud > Token-Based Authentication
The Token-Based Authentication setting is in the Manage Authentication group.
Step 3: Create An Integration Record
Next, create an Integration Record. To do this, navigate to: Setup > Integration > Manage Integrations > New
The Integration form will appear.
In the Name field, enter: SuiteQL Query API
Enable the "Token-based Authentication" option.
Disable the "TBA: AUTHORIZATION FLOW" option.
Disable the OAuth 2.0 "Authorization Code Grant" option.
Click the Save button.
The Integration will be created, and the details will be displayed. It will look something like this.

When the record is created, NetSuite will assign it Client Credentials.
Make note of the "CONSUMER KEY / CLIENT ID" and "CONSUMER SECRET / CLIENT SECRET," as you're going to need those later. Be sure to store them somewhere safe, as this is the only time that NetSuite will make them available.
Step 4: Create A Role
To use the integration, you'll need an Access Token, and before you can create a token, you'll need to associate it with a role. If you'd like, you can use an existing role, and make any necessary changes to it. But I recommend creating a new role instead.
To create a role, navigate to: Setup > Users/Roles > Manage Roles > New
The Role form will appear.
In the Name field, enter: SuiteQL Query API
In the ID field, enter: _suiteql_query_api
On the Permissions tab, assign the following permissions:
• Reports - SuiteAnalytics Workbook (Level Edit)
• Lists - Employee Record (Level View)
• Lists - Employees (Level View)
• Setup - Login Using Access Tokens (Level Full)
See below for additional information on these Permissions, and the impact that they have with regard to the tables that you'll have access to via the RESTlet.
The form will look something like this.

Click the Save button to continue.
Step 5: Create or Update an Employee
When creating Access Tokens, you associate them with an employee, and specifically with an employee / role combination. So before we can continue, we need to assign the Role that we created above with either an existing employee, or with a new employee.
For now, let's assign the role to your employee record. To do so, navigate to: Lists > Employees > Employees
Find your employee record, and click to Edit it.
Under the Access tab, under Roles, select the new SuiteQL Query API role.
Then click Save to commit the change.
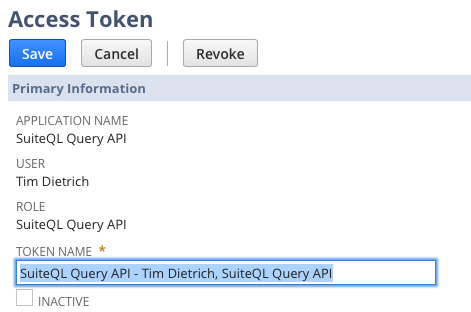
Step 6: Create an Access Token
We can now create an Access Token. To do so, navigate to: Setup > Users/Roles > Access Tokens > New
The Access Token form will appear.
For the Application Name, select: SuiteQL Query API
For the User, select your employee record.
For the Role, select: SuiteQL Query API
The Token Name field will automatically be set with a value based on the other fields.
Save the record.
The Access Token will be created, and the details will be displayed. It will look something like this.
Just as we saw when creating the Integration Record, when an Access Token is created, NetSuite automatically assigns a few values. This time, it assigns a TOKEN ID and TOKEN SECRET. Again, make note of those values, as you're going to need those later. Be sure to store them somewhere safe, as this is the only time that NetSuite will make them available.
Step 7: Give the Role Access to the Script Deployment
There's more step that you need to take before making calls to the RESTlet, and it involves giving the SuiteQL Query API role access to the script deployment.
Navigate to: Customization > Scripting > Scripts
Find the SuiteQL Query API script in the list, and click View. The Script record will be displayed, and will look like this.
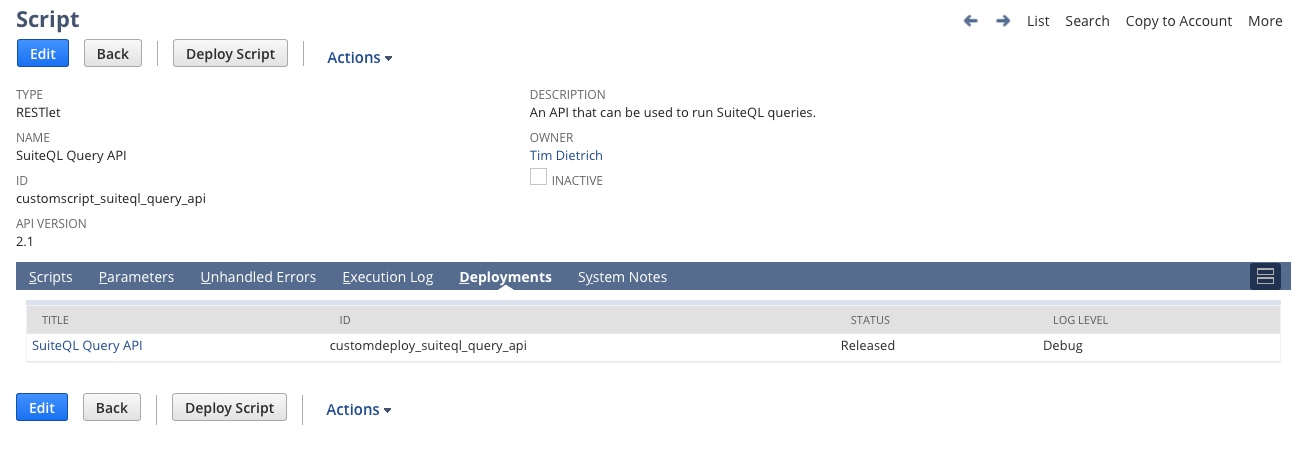
On the Deployments tab, you'll see the SuiteQL Query API deploment. Click on the deployment's title to navigate to the deployment record. Then click Edit.
Under the Audience tab, under Roles, select: SuiteQL Query API
The form will look like this:
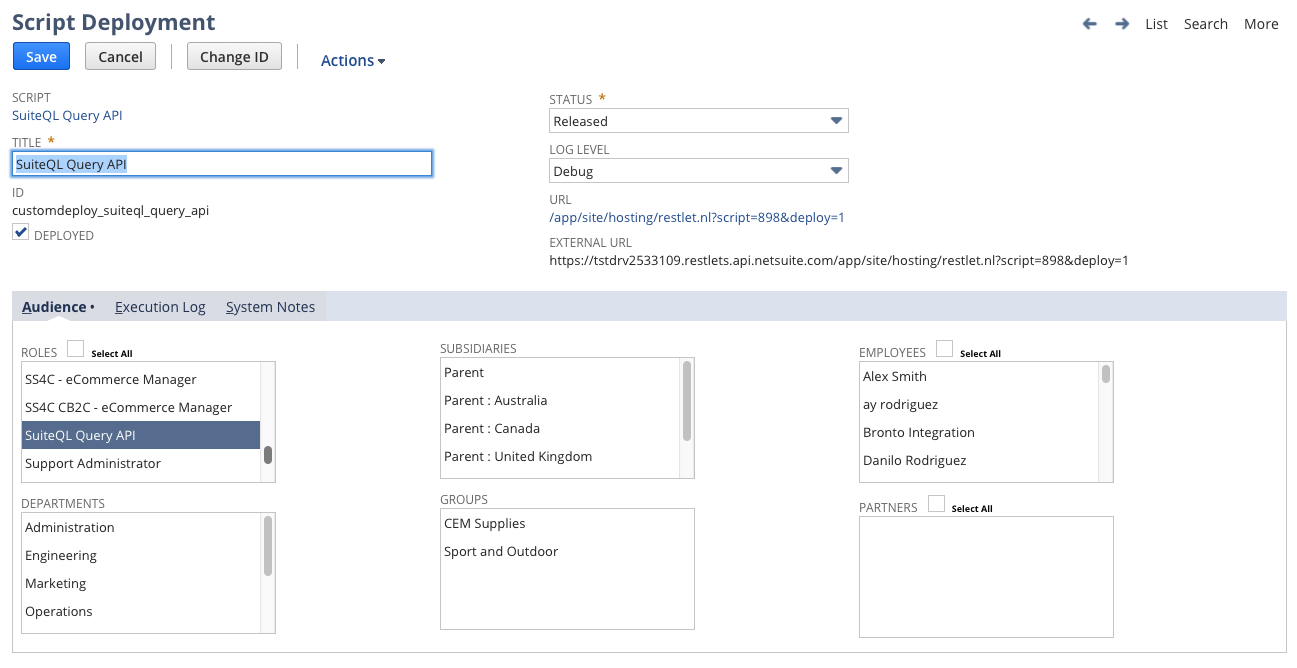
Click Save.
Before navigating away from the Script Deployment page, make note of the Script Deployment's External URL. This is the URL that you'll use to make calls to the RESTlet.
Testing the Integration
In order to call the RESTlet, you'll need:
• The Script Deployment's External URL.
• Your NetSuite Account Number.
• The Consumer Key and Secret that was assigned to the Integration Record.
• The Token ID and Secret that was assigned to the Access Token.
As I mentioned earlier, how you call the RESTlet will depend on the application or development environment that you're working in. I usually test my API calls using Paw, an advanced API tool for macOS. If you're on a Mac, then I highly recommend giving it a try.
However, many developers also use Postman. I'm not going into depth with regards to how you make API calls from Postman, although I might do that in a future post. But for now, here are some tips that might help if you're using Postman:
• Use "POST" as the HTTP method.
• For the URL, use the Script Deployment's External URL.
• For Authorization, use OAuth 1.0 as the Type.
• Be sure to select "Request Headers" for the "Add authorization data to" field.
• For the Signature Method, select HMAC-SHA256.
• Use the Consumer Key and Secret that was assigned to the Integration Record.
• Use the Token ID and Secret that was assigned to the Access Token.
• Under the Advanced Authorization settings, set the Version to 1.0, and the Realm to your NetSuite Account Number. If you're using a Release Preview or Test Drive account, then your Account Number might include letters. If so, be sure to enter them as capital letters.
• For the request Body, enter a JSON-encoded payload that includes a "query" attribute and set it to the SuiteQL query that you want to run.
• Under Headers, add a Content-Type header with value: application/json
If you run into problems when calling the RESTlet, I recommend searching in the NetSuite Help Center for "Token Based Authorization Headers."
Sample Queries
Here are a few sample queries that you might want to try.
Hello World
{
  "query": "SELECT 'Hello world!' AS Greeting FROM DUAL"
}
System Date
{
  "query": "SELECT TO_CHAR ( SYSDATE, 'DS TS' ) AS SYSDATE FROM Dual"
}
Employees
{
  "query": "SELECT ID, FirstName, LastName, Email FROM Employee ORDER BY LastName, FirstName"
}
Employees (with a single query parameter)
{
  "query": "SELECT ID, FirstName, LastName, Title FROM Employee WHERE Title LIKE ? ORDER BY LastName, FirstName",
  "params": [
    "Sales%"
  ]
}
Employees (with multiple query parameters)
{
  "query": "SELECT ID, FirstName, LastName FROM Employee WHERE LastName LIKE ? AND FirstName LIKE ? ORDER BY LastName, FirstName",
  "params": [
    "A%",
    "C%"
  ]
}
A Note About Permissions
When using the RESTlet, it's important that you understand how permissions work. It's actually quite simple. The tables that you can access are based on the Role that is associated with Access Token that you're using.
In the video, when I setup the role, I granted it the following 4 permissions:
• Reports - SuiteAnalytics Workbook
• Setup - Login Using Access Tokens
• Lists - Employee Record
• Lists - Employees
The "Reports - SuiteAnalytics Workbook" and "Setup - Login Using Access Tokens" permissions are required. "SuiteAnalytics Workbook" is required to make SuiteQL calls, and "Login Using Access Tokens" is required to authenticate using access tokens.
In the example, I wanted to be able to query against the Employee table. So I also granted the role both the "Lists - Employee Record" and "Lists - Employees" permissions. If I wanted to access transactions, or items, or anything else for that matter, I'd need to grant additional permissions. Often, determining what permissions are needed is the most difficult of using this approach. (If you have questions about what role you might need, feel free to "ping" me, and I'll try to help.)
One of the interesting things about this approach is that you can create as many roles, and generate as many tokens, as you need. And you can then use those tokens in various integrations without needing to modify the RESTlet. So you can issue one token for an app that needs access to employees, and another token to an app that involves orders, and maye another token that needs access to all of that data and more. It's a flexible and secure way to leverage SuiteQL in your integrations.
Wrapping Up
I'll write more about the RESTlet in the future - and I hope to post in more detail about calling the RESTlet from applications such as Paw and Postman, and from languages such as PHP, ColdFusion, Xojo, LiveCode, etc.
In the meantime, I hope you find it to be helpful. And if you have any questions about it, please feel free to reach out to me.
The RESTlet
I'm making the RESTlet available free of charge, and the SuiteScript is included below. The script is also available as a download.
/**
* @NApiVersion 2.1
* @NScriptType Restlet
* @NModuleScope Public
*/

/*

------------------------------------------------------------------------------------------
Script Information
------------------------------------------------------------------------------------------

Name:
SuiteQL Query API

ID:
_suiteql_query_api

Description
An API that can be used to run SuiteQL queries.


------------------------------------------------------------------------------------------
MIT License
------------------------------------------------------------------------------------------

Copyright (c) 2021 Timothy Dietrich.

Permission is hereby granted, free of charge, to any person obtaining a copy
of this software and associated documentation files (the "Software"), to deal
in the Software without restriction, including without limitation the rights
to use, copy, modify, merge, publish, distribute, sublicense, and/or sell
copies of the Software, and to permit persons to whom the Software is
furnished to do so, subject to the following conditions:

The above copyright notice and this permission notice shall be included in all
copies or substantial portions of the Software.

THE SOFTWARE IS PROVIDED "AS IS", WITHOUT WARRANTY OF ANY KIND, EXPRESS OR
IMPLIED, INCLUDING BUT NOT LIMITED TO THE WARRANTIES OF MERCHANTABILITY,
FITNESS FOR A PARTICULAR PURPOSE AND NONINFRINGEMENT. IN NO EVENT SHALL THE
AUTHORS OR COPYRIGHT HOLDERS BE LIABLE FOR ANY CLAIM, DAMAGES OR OTHER
LIABILITY, WHETHER IN AN ACTION OF CONTRACT, TORT OR OTHERWISE, ARISING FROM,
OUT OF OR IN CONNECTION WITH THE SOFTWARE OR THE USE OR OTHER DEALINGS IN THE
SOFTWARE.


------------------------------------------------------------------------------------------
Developer
------------------------------------------------------------------------------------------

Tim Dietrich
* timdietrich@me.com
* https://timdietrich.me


------------------------------------------------------------------------------------------
History
------------------------------------------------------------------------------------------

20211205 - Tim Dietrich
- Initial public release.


*/


var
     log,
     query,
     response = new Object();


define( [ 'N/log', 'N/query' ], main );


function main( logModule, queryModule ) {

     log = logModule;
     query = queryModule;

    return { post: postProcess }

}


function postProcess( request ) {

     try {

          if ( ( typeof request.query == 'undefined' ) || ( request.query === null ) || ( request.query == '' ) ) {
               throw { 'type': 'error.SuiteAPIError', 'name': 'INVALID_REQUEST', 'message': 'No query was specified.' }
          }

          if ( typeof request.params == 'undefined' ) { request.params = new Array(); }

          response.rows = query.runSuiteQL( { query: request.query, params: request.params } ).asMappedResults();

          return response;

     } catch( e ) {
          log.debug( { 'title': 'error', 'details': e } );
          return { 'error': { 'type': e.type, 'name': e.name, 'message': e.message } }
     }

}